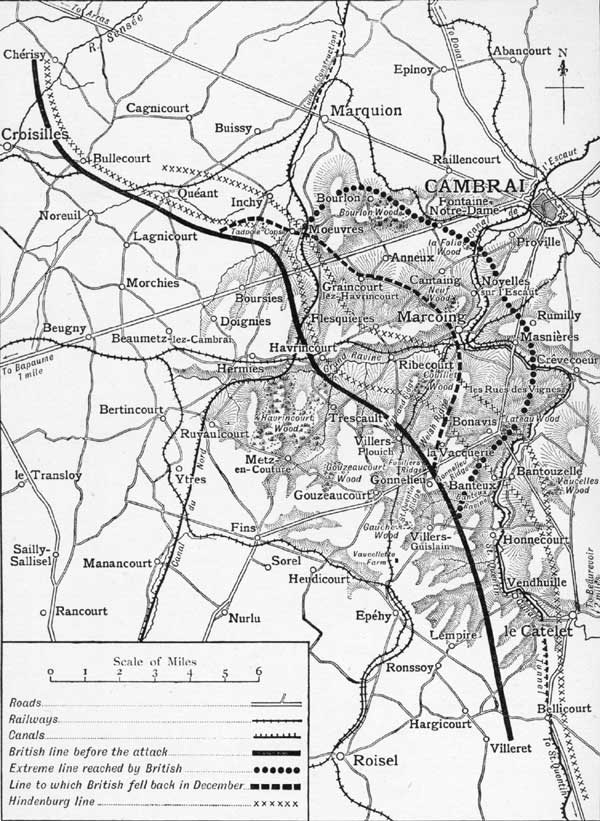
The Battle Plan
Following the battle of the Somme, the Germans decided that never again would their army be subjected to a defensive battle on the same scale, and that henceforth an impenetrable line would be constructed that would fatally wear down the allied forces trying to penetrate it. Behind this fortress Germany could build up her strength to launch a final campaign that would sweep the British to the Channel ports, capture Paris and bring victory. Such was the Siegfried Stellung, the ‘Hindenburg Line’ as the British called it, to which the Germans retreated between 14th March and 5th April 1917.
Even before 1917, Cambrai had become one of the most important railheads and HQ towns behind the German lines. Now, so strong was the defensive position here that German Divisions decimated during Third Ypres were sent here to recuperate and refit. It included two lines of fortifications, with barbed wire belts tens of yards wide, concrete emplacements and underground works. A third parallel line was also under construction.
Haig approved a novel plan for an attack on Cambrai that was put to him on 16th September 1917, while the Third Battle of Ypres (Passchendaele) was at its height. The assault was to be planned and carried out by the Third Army, commanded by Julian Byng, and involved a tactically sophisticated sweep that would encircle and capture Cambrai. After carefully considering the operation, 19 divisions were assembled - and Haig granted the request for the entire Tank Corps to be deployed, composed of some 324 tanks. Included in this force were fourteen squadrons of the Royal Flying Corps and three British and two Indian cavalry units. In the area of Cambrai, the Germans had only six divisions, but of course they were firmly entrenched behind the Hindenburg Line. Included in the plan was the capture of the dominating heights of Bourlon Wood on the left, and on the right exploiting the breakthrough by sending three cavalry Divisions across the St Quentin canal and to the rear of the town. The cavalry would then encircle Cambrai, joining the other troops north of Bourlon.
The German line ran west north-west so that if the British were to reach the canal, they would have to push some ten miles through in order for the attack to be successful. Two-thirds of the tank force was to attack the Hindenburg Line while the remaining force was to be held in reserve to attack a defensive position three miles in the rear. This was Byng’s first tactical mistake. Although the tanks at Byngs disposal were of far better quality than those employed at the Somme, they were still archaic and could not be relied upon to even reach the front without some mechanical failure taking place. Utilising only one-third of this force for such a strong second objective was tempting fate.
Other key elements of the plan included the use of recently developed tactics, including airborne bombing to stop German reinforcement by rail; the maintenance of surprise by the use of predicted artillery fire that required no registration; and the use of massed tanks with infantry groups in support. This latter tactic was not wholly welcomed, for the tanks had yet to prove themselves, having hardly excelled in the 1917 fighting at Arras, Bullecourt and Ypres.
Trench map Marcoing October 1917: 88 MG Company
Progress of the Battle
The attack was launched at 6.20 am on 20th November. The British divisions in the front line were , from right to left, the 12th, 20th, 6th, 51st (Highland), 62nd (West Riding) and 36th (Ulster). In immediate support were the 29th and the 40th (Bantam) Divisions, and ready to exploit the anticipated breakthrough and sweep round Cambrai were the 1st, 2nd and 5th Cavalry Divisions. The Tank Corps deployed its entire strength of 476 machines, of which more than 350 were armed fighting tanks. They were led by the Tank Corps Commander, Brigadier Hugh Ellis, in a Mark IV tank called ‘Hilda’.
The 476 tanks advanced across a 10 km front, accompanied by the 6 infantry divisions, 2 cavalry divisions, 1,000 guns, and 14 newly-formed squadrons of the Royal Flying Corps.
Facing the British attack was the German Second Army under General Georg von der Marwitz. Within hours the wire of the ‘Siegfried Stellung’ had been crushed, the first, second and third lines pierced, and the Germans forced back some 6 km to Cambrai. In general, success had been achieved all along the line except at Flesquieres (in the centre of the attack) where Col. Harper of the 51st Highland Division had determined not to work in tandem with the tank commanders, suspicious of tank technology. On this first day 8,000 prisoners and 100 guns were captured, and by evening the British had advanced some three miles. However, the ‘victory’ which was claimed was not all it seemed: 179 tanks were now out of action, of which only 65 had been destroyed by enemy action, while 114 had broken down either mechanically or as a result of failure to cross trench systems. In no part of the line had final objectives for the day been reached, the secure crossing over the St. Quentin Canal had been made unfit for the cavalry, and in the left-hand sector the 36th and 62nd Divisions were dangerously exposed from the heights of Bourlon Wood.
Somewhat surprised, and much encouraged by these gains, Haig determined to press on, even though by the second day it was obvious that on the left Bourlon Wood remained a huge obstacle and on the right the vital bridge at Masnieres had been broken beyond repair. The flanking attack by the cavalry round Cambrai was now no longer possible - the whole point of the battle had been lost. In addition, a lack of available support to follow up the break-though of the first day resulted in a critical loss of momentum. This was the moment for Haig to close down the operation and withdraw to a secure line: instead he chose to persist in the attacks on Bourlon Wood - a strategy that made no sense, since the whole purpose of the battle had been lost. True, the wood was finally captured - at immense cost - but it was inevitable that it had to be abandoned in the face of the inevitable German counter-attacks. Why did Haig persist with this strategy? Was it because, having claimed a ‘victory’ on day 1, he could not then report to the war cabinet that the sacrifice was in vain?
The Left-Hand Sector: Bourlon Wood
When first presented with the plan for the attack, Haig recommended strengthening the left flank to take Bourlon Wood very early. Byng ignored his advice, and by nightfall on the 20th, it was clear that Haig had been right. From the dominating height of the Wood, the Germans held the British advance in front of Anneux and Graincourt.
The 36th Division on the first day moved up the dry excavations of the Canal du Nord, and lay alongside the Baupaume-Cambrai road by nightfall.
On the left of Flesquieres, the 62nd Division fought hard through the ruins of Havringcourt, up to and through Graincourt, and by nightfall were within sight of Anneux in the lee of the commanding height crowned by Bourlon Wood, which of course threatened their left flank. The Division had covered almost 5 miles from their start point, and were exhausted. Their attack was later claimed to be a record advance in the Great War by troops in battle.
The 51st (Highland) Division had a very hard fight for Flesquieres, which they finally crept into during the night after it had been abandoned by the Germans, but the Division had failed to keep up with the pace of advance on either side, leaving a dangerous salient which exposed the flanks of the neighbouring Divisions. On the morning of the 21st, the 51st Division moved forward with the aid of two tanks (without however their close support) towards Fontaine, but were held up by fire from the wood.
In the centre of the British attack, the 6th Division, once it had crossed the Hindenburg Line, moved forward and captured Ribecourt and fought as far as and through Marcoing. The 5th Cavalry Division advanced through them but were repulsed in front of Noyelles.
By the evening of the first day, however, the element of surprise was almost completely gone and Prince Rupprecht was beginning to pour reinforcements into the breech. Four German divisions arrived on 21 November and seven more were on the way. In a large clash of open warfare, an anomaly by this stage of the war, the Germans forced the British back. Finding themselves in a salient position some seven miles wide and six deep, the British realised that they were in a precarious situation. General von der Marwitz, commanding the German Second Army also realised the nature of the British position and requested to the High Command that he attempt to encircle this force. Even the logical minded Prince Rupprecht saw this as an opportunity for a Teilniederlage (partial overthrow) of the British Army - an opportunity the German Army had not seen in years.
By the evening of the 21st, the second day, Haig was satisfied that ‘no possibility any longer existed of enveloping Cambrai from the south’. In other words, the rationale for the whole action had now been lost. But the British were now in an exposed position in the lee of Bourlon Wood, the capture of which would, he considered, still prove to be useful, in cutting German access to key light railway lines feeding their front. Haig and Byng decided to press on, even though it meant deepening the salient that had been created, and throwing in even more troops into this northern sector of the battlefield.
Harper therefore ordered a halt to any further advance in other sectors until the 62nd Division had captured the heights of Bourlon Wood. Unfortunately, the Division had first to fight a violent and costly battle for Anneux, led by their 186th Brigade. To the north, the 36th Division, planning to continue their advance beyond Moeuvres, waited for the success signal, signifying that the 62nd had captured Bourlon. It never came, for the 62nd could not penetrate beyond the sunken lane facing the wood
On the 22nd, the GOC 40th Division at Beaumetz-les-Cambrai received orders to relieve the 62nd Division the next day. The 40th was a division of Bantams, men under regulation height. By now the roads were breaking up under the strain of thousands of men, wagons and lorries. It took 40th Divisional HQ 15 hours to travel the 9 miles to Havrincourt. A relief and assault plan was quickly drawn up: 121 Brigade to capture Bourlon, 119 Brigade in support, both jumping off from the sunken lane. On their right, the 51st Division would move forward to Fontaine. On the left, the 36th Division would go in again at Moeuvres. 92 tanks would support these units.
The joint attack was launched through ground mist on the morning of the 23rd. Some of the units of the 40th had to cross 1000 yards down the long slope from Anneux, across the sunken lane and up the final rise into the wood, all the while under shell fire. There was close and vicious fighting in the wood, but after 3 hours, the Welsh units of 119 Brigade were through and occupying the northern and eastern ridges at the edge of the undergrowth. The 121st Brigade were cut down by heavy machine gun fire, and few got as far as the village. 7 tanks reached Bourlon, but were unsupported and the survivors withdrew.
On the flanks, the 36th and 51st Divisions made little progress, against strengthening opposition. Over the next few days, further troops were thrown into the battle, including the Guards who advanced into Fontaine. Once the Germans had been driven from the wood, the enemy switched all of his artillery onto it, and those battalions in the wood were now completely wiped out. Three companies of the 14th HLI miraculously penetrated to the far side of Bourlon, but were cut off and gradually annihilated. And it began to snow.
Life began to return to trench normality as the troops settled into the newly-won positions. The British now sat some way ahead of the position of 20th November, being in possession of a salient reaching towards Cambrai, with the left flank facing Bourlon, and the right flank alongside the top of the slope which ran down towards Banteux. The whole position was extremely vulnerable to German counter-attacks.
The Right-Hand Sector : Failure to capture the Bridge at Masnieres
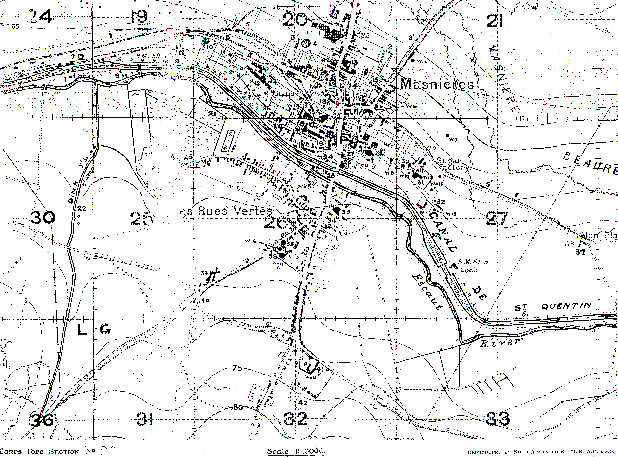 Trench map Marcoing October 1917: 88 MG Company
The attack opened on 20th November with an intensive predicted-fire barrage on the Hindenburg Line and key points to the rear, which caught the Germans by surprise. This was followed by a curtain of a creeping barrage behind which the tanks and infantry followed. The plan was a tactical success, and a ground-breaking event in the development of modern warfare.
In the centre between the left and right flanks, the 29th Division moved forward from their start line at Gouzencourt, swept across the Hindenburg Line and took position by nightfall across the canal in front of Marcoing.
On their right, the 20th Division captured La Vacquerie after a hard fight, and then advanced as far as Les Rues Vertes and Masnieres - where there was a vital bridge crossing the St. Quentin Canal, vital because it appeared to offer the only crossing point for the 2nd Cavalry Division to sweep round and encircle Cambrai. However, a disaster occurred. The weight of the first tank to cross the bridge, Flying Fox, broke its back. Infantry could cross slowly by a lock gate a couple of hundred yards away, but the cavalry advance was effectively halted and the whole point of the battle of Cambrai was ruined. An improvised crossing was made that allowed B Squadron of the Fort Gary Horse to cross, but they were left unsupported and withdrew. The destruction of the Masnieres bridge was further compounded by the inexplicable failure of the Staff to notice until too late in the day that a second crossing point of the canal did indeed exist at Crevecoeur-sur-Escaut, and which was very lightly defended. The opportunity to capture it was lost.
On the right, the 12th Division moved forward through Bonavis and Lateux Wood, and dug in a defensive flank to allow the cavalry to pass unrestricted, as ordered. On the extreme right of the attack, the 7th Royal Sussex got into Banteux, which had been subjected to gas attack from ‘Livens’ projectors.
The German Counter-attack, 30 November - 4 December
Erich Ludendorff, the effective head of the German Third Supreme Command, ordered an immediate counter-attack only to discover that reserves could not be brought forward for a further two days. At one stage he even contemplated a general withdrawal from the Cambrai front. Marwitz, the local commander, may have been stunned by the onset of the attack on 20 November. However in pressing home wave after wave of German counter-attacks, starting in a small way, he worked to recover small areas ground lost to the British.
The Germans began planning for their major counter-strike around the 23rd November, as their strength in the area began to mount and it became clear that the British had shot their bolt. The plan was simply to cut of the neck of the salient by attacking on each side, with the strongest blow to come by slamming into the southern flank of the British salient.
The Southern Sector
The blow fell at 7.30 am on the 30th, and was devastatingly fast and effective. Some 20 divisions were deployed, using so-called Hutier infiltration tactics (named after the German commander who had first deployed them, Oskar von Hutier), and which were to prove so effective in the final German offensive of March 1918.
After a heavy bombardment, the German 2nd army broke through approximately three miles towards Havrincourt Wood. The first attack fell on the 55th (West Lancs) and 12th Divisions on the south-eastern side of the salient. The Germans climbed the slope to re-take Lateau Wood, pushed up the complex of shallow ravines south of Banteux, and moved through Villers Guislain, and past Gouzeaucourt. Interestingly, amongst the troops defending the artillery positions at Gouzeaucourt were the 11th US Engineer Company. The direction of the assault was across British divisional boundaries, and the command structure rapidly broke down as the troops became mixed up.
Mysteriously, although this advance was detected by British observation posts, nothing was done to counter the German move. Byng’s Third Army faced disaster, with the real prospect of several divisions being cut off in the trap, not only by closing the ring but also occupying virtually all their lost ground. The advance could have probably extended even further, but in a foreshadow of developments in 1918, German soldiers, undernourished by a steady diet of dark ‘K’ bread and turnips, frequently stopped their advance to loot bountiful British stores of food and rum.
The Northern Sector
The German counter-attack on the northern flank, launched on 30th November to coincide with the Southern attack, was not nearly as successful, with the result that about half the ground gained in the battle was retained by the British after 7th December - the official closure of operations.
Three German divisions attacked, supported by an intense phosgene barrage, intending to cut the Bapaume-Cambrai road near Anneux Chapel. They were repulsed by the machine gun barrage of the 47th, 2nd and 56th Divisions, who had relieved the 36th and 40th. Advancing down the ridges of Bourlon wood and into the teeth of the British defences, the entrenched soldiers mowed down the Germans as they rushed forward in a series of double waves, sometimes eight or ten ranks deep. No Germans reached the road. By the evening of 30 November, Prince Rupprecht stated that “if the success is still not by a long way as great as was expected, it must nevertheless be accounted a sharp defeat of the enemy”.
The Results of the Battle
As the battle for Cambrai subsided, small skirmishes continued until an immense blizzard struck the area on 3 December. On the same day, Haig called for a partial withdrawal from the area for the salient was still far too difficult to maintain, ordering a retirement ‘with the least possible delay from the Bourlon Hill-Marcoing salient to a more secure and shorter line’. On 7th December operations were officially closed down.
The left and centre were ordered to fall back to Flesquieres and a section of the Hindenburg Line by 4 December. The gains on the northern flank were now half the size of the losses on the southern. In the end, casualties were both about equal. The Germans suffered losses of approximately 50,000 and the British 45,000. The British had taken 11,000 prisoners while the Germans gained 9,000.
These casualties were high. Some knowledge of the new weapon had been gained, however. If ultimately the massed deployment of tanks had failed to achieve the desired for breakthrough, it had nevertheless demonstrated the potential for targeted use of the tank in offensive operations. At home, civilian morale was given an uplift. By recent Western Front standards, the advance on the first day was little short of miraculous. News of the initial spectacular breakthrough served to greatly enhance Byng’s reputation; and it resulted in the ringing of church bells in Britain for the first time during the war. In the light of subsequent events, this was indeed ironic.
Later on, questions were asked in the House. Byng’s report blamed badly-trained troops. Several middle-ranking commanders were sacked. But the hard fact remained that this audacious plan had utterly failed, and although some ground had been gained, in places the Germans were in ground formerly occupied by the British. A small salient remained at Flesquieres, which was an exposed position ruthlessly exploited by the German assault in March 1918. Although the result of the battle was a virtual draw, with the front lines shifting slightly, the battle of Cambrai marked a major turning point in the course of the war - and military history as a whole. The era of trench warfare was coming to an end and technology was beginning to reign supreme on the battlefields of Europe.